


Read more
ea888 timing chain interval
What's going on everybody's Charles in this video I'm gonna show you how to properly time a 2-litre turbo chain-driven engine the engine I have here on the stand is out of a probably a 2010 Audi q5 it is going to be very similar to the VW CCTA and BFA engine codes the main difference there is this one has valve lift and those engines are not going to have that however the
The timing process is gonna be pretty much the same we're gonna go over how to time all the ballast shafts and time the timing circuit of the engine now I normally don't take this heart of a stance on what I'm about to say next but this is very important this video is not meant to replace the factory repair manual for doing this job you still need to have the factory repair manual when you do this job this is the type of job that you need to follow all the
Replacement bolt recommendations all the factory torque specs all of it and of course you want to make sure that if you're going this far in you're replacing components you're putting new guides on it you're putting new chains on it now this is a junk engine so we're not gonna be replacing any parts but if you are doing this in your car you want to make sure you get all new stuff on there this is a very delicate operation and anything that's not done a hundred
Per cent perfect can end up in a best-case scenario something minor wrong like a little bit of engine vibration because we got our balance shafts out of time - something catastrophic like timing chain failure and bending a valve so it is very very important of the utmost importance super critical that you have the factory repair manual while doing this kind of work on an engine if you don't have the factory repair manual I will put a link down in the description
Where you can go and download what you need it's not free but that small investment for the repair manual is gonna be worth every penny so there's your warning there's your disclaimer make sure that you are following everything step-by-step and now let's strip this engine down and go ahead and retime it alright we have our engine completely stripped down of all of our chains the only chain that's hanging out here is the oil pump chain
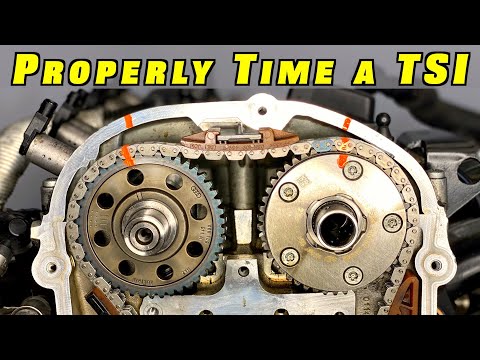
And it's not time but we're still gonna go ahead and put it on now in order to be sure we can see all this a little bit easier and add some extra marking to everywhere where it makes sense to add some marking these are just really accentuating the timing marks that are already on the engine I'll pull this balance chef's gear off and go ahead and do that we'll mark our cams where our coloured links are gonna go and we'll mark our balance
The shaft we're gonna also mark our crankshaft gear you'll notice there's an arrow here pointing towards the teeth of the gear there's an arrow here pointing towards these teeth and then this outer gear set this is for the oil pump drive so we don't need to worry about this one the only two marks we need to worry about are this one and this one here this mark on that's pointing to the outer teeth is for the balance shaft that's the furthest back chain as we're
Looking at the front of the engine this one here points to the middle gear set which is our timing gear set so we'll go ahead and just paint those to make them a little easier to see now I'll be able to see those at a little quicker glance now if we flip the gear over we'll notice that there is a tiny flat spot right there this is sort of like a key very poor quality key for this crankshaft gear this has to meet up with the spot down here on the crankshaft itself
You'll also notice that there's a notch right above where that flat spot is I like to paint that too and then we'll go ahead and paint it to the corresponding gear tooth and then one more time on the outside this will be our indicator telling us where that flat spot is because as we install this gear we're only going to be looking at it this way we won't be able to see the backside of it so that's just a little quick indicator speaking of that crankshaft
Gear it's very important to make sure you do a good thorough inspection on this gear before just installing it a lot of times when there's an engine damaged that little keyway gets rounded out and if that keyway is rounded off like you can see here then what typically happens is your gear to your crankshaft ends up out of time and if that's the case of course on your engines gonna be out of time might still run but odds are you're gonna get some
Timing faults so that's gonna be something you need to pay extra close tension to do a thorough inspection on these parts before simply putting them back in now let's go ahead and talk about getting our engine primed up to get our chains put on as you can see we have our camshafts already installed and bolted down these camshafts are pretty close in the spot that they're gonna end up being in I think this intake can need to roll
Back just a little bit but we're close and that's gonna be good enough for what we're doing at first moving down you can see we have our balance shaft chains pretty much in place this is roughly where the exhaust side balance shaft is gonna time up for our front side balance shaft or our intake side balance shaft we have the balance shaft which is this gear back a little bit and then we have the relay shaft we need to make sure that these two gears our time together
If these two gears aren't timed properly your overall balance shaft circuit is going to be out of time and you'll end up with some engine vibrations moving on to our crankshaft which is this right here what we're looking for for this to be at TDC is that flat spot on the crankshaft that lines up with the flats but on the gear should basically be at 12 o'clock if we look at where the main bearing cap bolts to we'll see the break right here
These need to be parallel what we can also do is look just above where we're looking at the crankshaft here and you'll actually see the connecting rod for piston number one should be pretty much at TDC if it's off a tiny bit that's not a problem but if you look through that little tiny window there and that's not what you see you need to get that cylinder one piston up to TDC and we don't need to worry anything about our oil pump chain that'll just go
When we put this gear on let's go ahead and start with our balance shaft chain since it's well the one that we need to start with because it's the furthest one back we have our exhaust balance shaft roughly in the place that it's going to be this moves pretty easily so if we need to adjust it a little bit no big deal the other side on the intake we need to get this timed up now if you are just doing this as maintenance do not take
This gear is off you don't need to I'm only taking it off to show you guys how time. this is properly if you look at this gear this is the actual balance shaft you'll see a little dot and these actually are usually painted from the factory with a yellow mark that is one of the timing marks we need to pay attention to that mark usually ends up right at the six o'clock position now the other side on the gear that I just pulled off we have two little dots that
We need to line up you can see them right here that tooth that had the one dot on the balance shaft itself lines up right in between these two teeth that each have a dot on them now these are only gonna line up once every eight turns so for some reason you spin the balance shaft it's gonna take a minute in order to line it back up those are our two teeth with the two dots there on the back set of gears let's go ahead put that in make sure we line that up there
We go so that should line up just like that and then our mark that's gonna line up with the chain is the dot on the outer part of the gear right here now our chain like the timing chain has darkened marks on them you can see this one and this one are quite a bit darker than the other one there are actually three darkened marks this is the one that goes on the crankshaft gear so we're gonna take those two marks and line them up here and on our exhausts
Balance shaft gear we're not going to worry about the crankshaft just yet so we'll take the one you get one side lined up you can see it right there nice and lined up we'll go ahead and mark this so you guys can see it a little easier we'll double check and make sure that these are still lined up properly if you don't move this gear much shouldn't matter we'll take our other side of our chain and we'll line the darkened mark up to that yellow mark
That I painted on next we are going to put our rail on for the top side of the balance shaft chain now we're going to leave this way for about a minute and a half because what we need to do next is we need to put our timing chain on now just like our balance shaft chain our timing chain has some darkened links this one has a copper link to it well this is actually an older version of the chain there is an updated version of the chain you want to make sure
You're using the newest revision because we want to make sure that we use the best chain that's out there what we're gonna do is we're gonna take this chain we're gonna drop it down through where the cylinder head and the block are bolted together we're gonna drop it down and all we're gonna do is we're just gonna hang it we're gonna hang it on the cams just like that we're just gonna leave it there next the important step of paying very close attention to what
We're doing we're gonna put this crankshaft gear on you're also going to want to make sure you have at the ready your bolt with the special tool or if you have the newer one which is way nicer than this you want to get that ready too so we have our mark here on the back this is the mark that's going to be facing straight up here is our balance shaft mark that's our timing mark and we don't have to worry about the oil pump so what we're gonna do
Some of these engines you can put this gear on and you have enough room to loop the oil pump chain up and over the gear others you can't usually the way I find out if I forget to do it and then well it doesn't reach so I have to end up taking it back off so what I've gotten in the habit of doing at this point is I will take this gear I will put the oil pump chain on I'll get the gear roughly where it's gonna go right about there I'll put the timing chain through
Doesn't matter where then I'll go ahead and put it on the engine you need to make sure that it goes on there all the way you're not sure if it's on all the way take it back off and try it again now what we should find is that our balance shaft should pretty much line up you can see our mark right there lines up pretty well all of our other marks are still in their place now before you do anything else take your bolt with your big spacer on it and
Install it if we don't do that we run the risk of the gear moving off of the crankshaft and then we're gonna end up with our crankshaft to our gear being mistimed if you'd like if you're a fan of marking which I know a lot of you guys are and take another mark and just Boop right there so that we see the mark that we made lining up TDC of the crank to the gear is now lined up to the block that'll just be
Another quick little visual indicator that hey we got it on there the right way next let's go ahead and put the rest of our balance shaft chain guides on we'll get this one down here we'll go ahead and put our tensioner on as well another opportunity to just make sure that hey my marks line up whether you paint your own or not doesn't matter you should still have the marks lined up and we'll put our tensioner in make sure I usually take my finger and I'll just
Hold tension on the chain make sure all my marks line up things get a little sideways on you remember you always want the slack of the chain before it's tensioned on the tensioner side that way the tensioner does what it's supposed to do and takes up the slack next up it is time to get our camshafts timed up and deal with our timing chain this is probably one of the most critical things we're gonna do a mistake here can actually lead to engine damage
What we're gonna first do is we're gonna first set our camshafts and in order to do that we need our camshaft holding special tools right here what these are gonna do is these are gonna bolt on right here in the front of the cylinder head and then slide so we can lock our camshafts we have one for the intake camshaft and one for the exhaust camshaft you're also gonna need a 15-millimetre wrench for the exhaust camshaft this is gonna allow us to turn
The camshaft just a little bit and you'll need an 18-millimetre wrench for the intake side so again it'll allow us to just to move the camshaft a little bit to get it locked into place we want to try and lock them into place as close as we can to their TDC position now there's no factory markings for the cam gear to the cylinder head or the cam bridge or anything like that so what we're gonna do is we're gonna take a measurement from this guide rail mount
To our marks on our gears themselves so the distance from this centre portion of our guide holder to our mark on our intake side is to be 61 to 64 millimetres we'll go ahead and take that measurement so that's 61 it looks like 61 we're off about two teeth what we're gonna do to lock our camshaft down is we'll take our 18-millimeter wrench we'll rotate the camshaft until our mark lines up with our calliper that's gonna be right about
There now what we're gonna do is we're gonna slide the cam lock in that might mean we have to roll it back a little that might mean we have to roll it forward a little one way or another we're gonna lock that in place now we'll take our measurement again and we're right at about sixty-two millimetres so that should be exactly where we need this to be and now our camshafts locked in so it won't jump out of place we're gonna do the same thing for the exhaust
The side now they don't give a measurement from here to here on the exhaust side but they do give you a total measurement between the two cam gear marks that total measurement is a hundred and twenty-four to a hundred and 26 millimetres which basically means that this distance is gonna be about the same as this distance so we should be in the sixty two or so millimetre range from the centre part of the upper guide holder to the mark on our exhaust cam
We're actually pretty darn close let's take our overall measurement and that's a hundred and twenty-five millimetres which is exactly where we want to be so what we'll do we'll just slide and lock our exhaust came in that went right on no problem now that we have our cams locked we can go ahead and put our timing chain on we'll just line up our marks here now if you're worried about the exhaust sidechain popping off you can zip tie through here and that'll
Hold it on a little bit better they're not a ton we can do on this side I guess we could get a clamp or something and clamp it on really though you don't really need to do anything here we can just leave these as is now we need to move down to the bottom side and get our timing chain lined up on our crankshaft gear you'll notice that it actually dropped right into the time we have another darkened mark and then our paint mark for our time
Here right here on the crankshaft gear let's go ahead and throw another little mark just to make it easier to see on the bottom of our timing chain there we go if you want to take an extra cautious step and hold this timing chain in place what you can do is run a zip tie through it use the zip tie to hold a little bit of tension on the chain this is not a necessary step just one of those little extra things that give you a bit of peace of mind now we can start putting
In some of our publications on our timing chain, we will begin with the only upon the pinnacle that one simply pops proper on we will then take our consumption aspect manual slide that up and into an area, we are able to move in advance and eliminate our zip tie retaining the chain on we will want a bit little bit of slack withinside the chain for the subsequent manual for the tensioner aspect manual we really want to take off the lock for the exhaust cam what we will do is we will take our 15-millimetre wrench lower back in the back of the equipment
We'll pull anxiety off the lock and slide it out after which the gears gonna roll lower back only a little bit however we've got our manual on and we've got our manual on and our consumption cam is locked so it should not soar time or something like that once more in case you're concerned approximately it throw a zipper tie thru the hollow and zip tie the chain down now we've got plenty of slack right here in the tensioner aspect of our timing chain we are able to take our manual slide it up and into the area now we've got this manual on we
Can definitely throw our tensioner on subsequent step permits to take our lock off of our consumption aspect we will do the equal aspect we did with the exhaust aspect simply pull the anxiety off of the lock so that you can slide it out and permit the cam to move slowly we are exact there now earlier than you do something else double take a look at all of your marks ensure all people strains up luckily move in advance pull your tensioner pin our subsequent step is gonna be to double take a look at our paintings which means we are gonna rotate the engine
Around complete revolutions and ensure that the whole lot is in which it is to be now right here's the kicker those hyperlinks that we painted whilst we rotate this engine round instances they are now no longer gonna line lower back up with those camshafts or with the crankshaft or truly another hyperlink to equipment Marc none of that stuff that is gonna line up it takes manner extra revolutions for all that stuff to line lower back up perfectly
Then simply the 2 rotations that we're gonna do so that you have multiple alternatives we have already got that brought TDC to mark down right here at the crankshaft so we do not actually need to fear approximately that in case you need to rotate it round via way of means of hand two times and take that dimension and the space among the 2 timing marks at the gears I'm excited by that every other alternative is to position your very own marks as reference factors on a set region so we'd take and paint proper right here
And perhaps proper right here at the cylinder head cowl you may additionally do this down in right here something you want to do truly to ensure that whilst you rotate this round instances all people strains up luckily so now we are simply gonna use those as reference marks for whilst we rotate round additionally in case you're the use of this plastic washing machine make sure you have no spark plugs or something like that once we rotate this engine round we do not need to have any more anxiety on
This nylon washing machine piece right here is as much as you in case you need to position the oil pump manual on now or wait I like to attend that manner it is one much less aspect to take off if I ought to retime it if we rotate the crankshaft round complete revolutions it is gonna be one rotation of the camshafts so that you want to do the crankshaft an excellent quantity of rotations, ok so that is revolutions you may see our mark strains up right here permits take a look at our marks up on the pinnacle yep notice
Though lookit those are painted marks that we did not even use and no we are on our marks on our equipment to our marks on our chain strains up in any respect that is why you can not rely upon the marks which you mark from the chain to the equipment in any manner to line lower back up on our rotations what we are able to do aleven though is we are able to ensure our marks that we brought line up that is why one of the motives why I like to feature them simply as a brief visible reference I imply if we do it
Right and observe the restore guide we should not want to do this I much like the short Hey appearance here is a mark cool it strains up and pass on as soon as you have turned around round instances and made certain your timing is proper if all people strains up satisfied you are exact to move you may take this pinnacle dimension one extra time simply to ensure that it is covered up and exact double-take a look at all of your marks in any other case it is time to position your oil pump tensioner on positioned your timing cowl on and complete
The relaxation of your timing process is all right so we're nicely timed the whole lot's satisfied all of our marks line up to ensure you are rotating this round as a minimum two times at the crankshaft perhaps extra in case you need to that is cool too to ensure that all people's lower back up at TDC in which it belongs that consists of cylinder primary piston that manner we are able to ensure our crankshaft equipment to our crankshaft is nice time and of the path with all of the relaxation of the stairs ensure you are
Following the manufacturing facility restore guide I like to position a brand new decrease cowl on ensure you update this crankshaft bolt be cautious setting the pulley on that could get a bit bizarre too and of the path when you have questions or remarks drop them down underneath I'll drop hyperlinks to the whole lot that we use nowadays down withinside the description men with that I out thank a lot for looking exact good fortune timing ensure you've got got the manufacturing facility restore guide and I'll communicate to you subsequent


0 Reviews
What are your experiences on your vehicle ...