


Read more
toyota 2jz engine build full start to finish

Hey I'm Abdulfatah Abdulrasheed we are right here at Frzautoelectrician racing nowadays we are gonna bring together the mythical hood a 2jz engine it is an inline six that is for a task that we are doing right here at the store in case you need to peer the disassembly of this engine or a number of the principle bearing clearances tests that we did I'll hyperlink to the video beneath withinside the description so let's get commenced and get this issue collectively so right here's the block so it is
Been bored out to 80 six factors 5 millimetres placed 5 millimetres large than manufacturing facility it is been decked because of this that they resurfaced the pinnacle of it and it is been warm tanks so that they placed on this tank and it cleans all the dust and the whole thing off of the outdoor of it however it additionally takes the authentic paint off of it so that you can see it is a touch bit rusty we are gonna paint it a touch bit later withinside the video so right here we're we are measuring the
Pistons so now what I'm doing is I'm double-checking the system keep to do this I've were given to degree every one of the Pistons make certain they are all that they are imagined to be then degree all the bores and make certain that we've the right piston of wall clearance and that is the clearance in among the piston and the cylinder wall additionally gonna test all the rod bearing and primary bearing clearances time to put in the Pistons onto the rods so
Use this meeting Lube and get the whole thing all lubricated those are what they name free-floating pins those little clips maintain them in you to put in it at the piston and the rod and the pin is genuinely capable of rotating each at the piston and the rod what is cool approximately those jé Pistons is they are each lined at the pinnacle and the edges the coating at the pinnacle facilitates with temperature and the only at the facet at the skirts facilitates with cylinder put on so that you ought to make certain
That the piston is hooked up at the rod well so what I'm doing is I'm searching at wherein the valve reliefs are at the pinnacle of the piston the consumption valve launch is a touch bit large than exhaust ones now that the whole thing is blueprinted and we recognise that the block is right geared up to be assembled I'm gonna pass and paint it so there is tape off all of the components that I do not need painted and get available with a few engine tooth we are gonna stay with ordinary black this
The time now it is time to make certain all of the gaps withinside the Rings are accurate what takes place is with a mild bore diameter alternate it could alternate the space withinside the ring and we need a completely particular hole so what I'll do is placed the hoop into the cylinder rectangular it up withinside the cylinder through simply setting a piston in it after which use a feeler gauge to peer if the space is the proper width so those are a touch bit slender so I'm gonna placed them withinside the ring grinder and in fact grind on the give up of
The ring so whilst it grinds the give up of the wing it is taking a number of the cloth off and while you do which you simply ought to make certain which you haven't any burrs or something on the rims that would probably scrape the cylinder wall or now no longer allowed the hoop to seat well as soon as the Rings are all gapped it is time to put in them onto the Pistons the primary one is the oil spring so this is like a spring that pushes out the oil earrings the following is the
The second ring this one is mostly a solid cloth that is a touch bit extra brittle so I'll defloration that a touch bit in a different way through increasing it in place of twisting it the solid earrings do not want to be twisted and will genuinely crack the pinnacle ring may be twisted on there is additionally little letters on those particular earrings that display that is up those have a touch n on them so I'll pass beforehand and twist that on after which do it to the relaxation of the alternative six distance I additionally want to
Number all of my pistons and which path they are gonna be hooked up into the block I sincerely want to double and triple test the whole thing in an engine now the Pistons of rods are geared up to head in so I'm gonna turn the engine over and placed the crankshaft in we have got already checked all of the principle bearing clearances and make certain the whole thing's splendid easy and we're going to pass beforehand and defloration all of the bearings subsequent earlier than I placed the crankshaft in we are gonna placed
The oil squirters in quite sincere they simply bolt proper in those are sincerely accurate due to the fact they assist to chill the piston in addition they lubricate the piston pin and the cylinder partitions those are referred to as the thrust bearings essentially while you push on your take hold of to disengage it pushes up in this bearing proper right here the thrust bearings I'm genuinely gonna lube each aspect of it that manner it is sincerely cheesy and sticks into the block and does not need to fall
Out after I visit placed the crankshaft in so very cautiously passed beforehand and set the crankshaft in that is only a manufacturing facility 2jz crankshaft they are solid they are sincerely accurate they are pretty sturdy in very not unusualplace human beings will make 1000 horsepower whilst those inventory cranks pass beforehand and placed meeting Lube on throughout the principle cap bearings and those are all numbered one thru seven and in addition they have an arrow for which became ahead at the engine is wherein
The pulley is and all the drive belts so all of the arrows point towards the crankshaft snout and where all the pulleys would go so go ahead and SAP all those in with the gun and then I'm gonna torque them up to the 33 foot-pounds that the factory recommends and then they also say do an additional 90 degrees so what I'll do is draw a line at 12 o'clock and I'll turn everything 90 degrees basically to three o'clock and that'll get us right into spec and
Then once everything's bolted in I like to make sure that everything turns freely and there are no issues there so now it's time to install the Pistons the cylinder walls are all nice and clean at first and then we're gonna put the piston ring loop on him I'm also gonna put some of this piston ring lube on the skirts of the Pistons and the Rings next I'm going to align all of the piston rings because the gaps need to go in specific angles and again
This is gonna vary depending on the engine manufacturer and even the engine builder on how they like to do it I always like to hold the piston with the exhaust valves pointing towards me and that way it can be consistent on each one of the Pistons when I align the Rings so this is the piston installation tool and I'm also gonna lubricate that as well because the Rings have to slide down it I'll double check the ring lineman again and now we're ready to put
It is the crankshaft is at the bottom dead centre which means the crankshaft pin or journal is all the way at the bottom that gives you the most room to make sure you don't push the rod into the main journal so these rods are from BC and it's their standard h-beam rod which is gonna work great for our application and they had them in stock which is great because this is such a short time between the time that we got the engine to the build we really wanted to use
Parts that were in stock and do not have to be custom ordered so we'll go ahead and install the rest of the Pistons and we'll be done with this part of it so once I saw the piston they should be pretty consistent as far as the tension it takes to push them down if for some reason they're a little bit different that could be a sign of an issue and then also make sure that you look at the cylinder walls and make sure there's no scoring or anything that happened on the
Installation because that'll show that maybe you had an issue with your ring gap or something like that so now turn the crankshaft and make sure everything spins smoothly next is time for the cylinder head was done by our buddy tom at Port flow he took the dirty head hot tanked it cleaned it way up he did what they call like a pocket port or like a bowl port and it's the area where the valve seat meets the casting in the head and a lot of time
The factories don't do a very good job of matching it and having a good flow in that section and doing a full port in Polish I don't believe it's necessary on these heads for the power levels that we're gonna be making this is what they call a CNC valve cutting machine you can actually program and how you want the valve seat cut and then it goes in there and cuts it all perfect tom then resurfaced the cylinder head and got it all ready for installation here's a
A quick picture of you can see the pocket port and you can see where the valve seat meets the inside casting is nice and smooth and that's where he ported it here's all of our super tech stuff so this is the valve train that we're gonna install into the cylinder head dual valve springs titanium retainers CNC keepers in canal exhaust valves and stainless steel intakes Tom will go ahead and put some grease on the valves when he installs them will then install
The spring base the locator keeps the spring centred within the spring locator key the Spring Center the dual valve spring is then installed and down in there you can even see the valve seal so the valve stem seal is what stops the oil in the cylinder head from going down the shaft of the valve the stem of the valve and into the cylinders or into the port this is what they call a valve spring compressor so the valve spring
The compressor reaches around it pushes on the bottom of the valve and the top of the valve spring retainer once it compresses it you can go ahead and put the keepers on once the keepers are both installed you can remove the spring compressor and now the valve spring and everything is all installed now we're gonna install the dowels into the block this is what aligns the cylinder head on to the block and keeps the gasket and everything in line I don't
I like to hammer directly onto the dowel cuz it can bend it so I made this little tool out of just a bolt in a nut that stays on the dowel and then I can hammer the bolt that way it doesn't mushroom the dowel pin at all so here's the head gasket it's a factory Toyota MLS casket it's called multi-layer steel and these are really good gaskets from the factory so we're gonna go ahead and just get a brand new one and use it in this build next we
Gonna put the cylinder head on and one of the things that's funky about assembling these two J engines is you actually can't put these washers on the head with the head studs installed so you have to put the washers in first then you put the head studs on then you can put the nuts and everything in so I've pre-lubricated the washers and the head studs and then once we put the nuts on we're ready to tighten and get our big torque wrench because we have to
Torque this up to 85-foot pounds and I'll do in a couple of stages here so I'll start by doing 30 foot-pounds then go up to 60 then 85 foot-pounds these are BC to 64-degree cams and it's relatively mild cam and for this drift car this is probably the best one for it little pro tip here if you grease the inside of your cam seals front and remain seals they tend to seal up and last a little bit longer in my experience I'll then put all the cam
Caps on and install the camp seals there's a little bit of silicone you see there that goes under that cam cap I'll just zap these bolts in a little bit you get to be super careful you install the cam caps because if you don't have the cams and the right orientation and you start tightening the cam caps in the wrong order you can actually break a cam so have to be really careful and follow the instructions on the order to put the cam caps in then we'll go ahead and
Torque all of the cam caps now I've got cams installed nice gonna put the oil pump on there's just some silicone and a couple of o-rings I've already changed the front main seal this is our new rear main seal there's some silicone on that as well op the reach in which kind of a pain and get these six bolts next we're gonna put on the upper oil pan so this one's really cool because it ties in the whole block and it's actually a bit of a
Stiffener for it as well there's no gaskets down here just silicone so put the silicone in zap in all the bolts and then torque it down to Toyota's recommendation so what they call an oil baffle and it helps to separate the spinning crankshaft from the oil that's in the pan this is the oil strainer or the oil pickup this is where the oil gets picked up from inside the oil pan and sucked through and into the oil pump so now you can see the
Stuff that goes on inside of your oil pan so if you ever have an oil pan that you hit something like something on the road and it dents it up it can hit the bottom of this oil strainer and that's how you can have a problem with your engine after because strainer can't actually pick up the oil from the pan anymore this is the oil level sensor it's got a little float there and it just throws a warning light on if the oil level gets too low this is where I
Tend to be a lot more generous with the silicone on the steel pans I'm gonna make sure that these suckers don't leak so I'll put a little bit extra silicone and then we'll put all the bolts in and then torque it and you'll see I'm using the torque wrench a lot here and the reason is it's so easy to over tighten something even after years of experience I believe that using the torque wrench doesn't take that much more time and you can get everything
Torqued perfect and once it's worked perfectly then you could be confident that it's not gonna fall out we'll go ahead and put the exhaust cam gear on torque that on and this is the intake cam gear this is where the variable cam timing works and inside of that gear some mechanics depending on the amount of oil pressure from the solenoid it'll actually adjust the cam timing on the intake we really do want this they can help as much as like 60 or 80
Foot-pounds of torque at low rpm and for a drifting car where you can be at low rpm a lot the -i engines are quite good for that application if you're doing drag racing or something where you're really spending all your time over five or six thousand rpm where the -i is pretty much back to zero it's not gonna be much of a benefit if any a little bit of blue Loctite will install the tensioner pulley again torquing it on and now we're gonna install the
The timing belt and the timing belt have a very specific alignment so on the lower gear there's an alignment mark on the gear and then also on each one of the cam gears so we'll line each one of those and then we can put the timing belt on last we're gonna put the timing tensioner in next we install the timing belt tensioner what it does is actually puts tension on the timing belt and before I pull the pin and actually put tension on the belt
I'm gonna turn it to revolutions and make sure that everything is still lined up properly and once I know it's all lined up perfect I'll pull the pin and allow the tensioner to tension the belt I'll then turn it again and triple-check that the belt is aligned properly once I know it's all perfect we're gonna move on to the next step so this is the oiling for the variable cam this pulls oil from the block down there and it goes up into that cam cap and from the
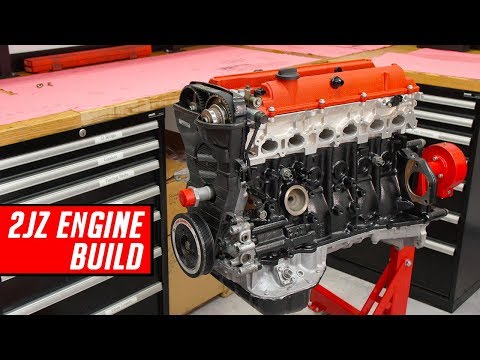
Cam cap goes with the variable cam magnet the method the variable cam works is that the pc sends out power to the present very little that then duty cycles a precise quantity of oil into that cam gear and counting on that duty cycle it will really modification the placement of that cam gear relative to the cam and by doing so it can change the location of the cam relative to the shaft primarily ever-changing the cam temporal order next we'll place on the valve covers I've had these Powder coated wrinkle scan and for years I believed it was originated by Honda on the kind our engines so recently I've complete that that is completely not the case Ferraris been doing wrinkle scan valve covers since the fifties and it seems that
Testarossa really means that redhead and Ferrari has wrinkled red valve covers for 50 sixty years currently and everybody's been I feel biting them so I've supplementary a touch little bit of silicone polymer on The corners of the cam caps and this can be a neighbourhood wherever the oil can often leak so a little bit of silicone there can ensure that you just do not have a leak in this section you'll be able to conjointly see wherever we tend to supplementary the fittings to the valve covers for the housing respiration system we're really attending to utilize each of the knock detectors on the engine and this can be another space
nonetheless, to observe out for thus I've disguised off that area after I painted the block as a result of i would like to create certain that the knock sensor is directly on the particular metal block and ensuring that we torsion it because counting on the torque the knock sensor can actually output a distinct strength signal next we have the cam set detector so this sensor tells the pc wherever that intake cam is respect to the shaft so currently, we're golf shot the temporal order covers on it is a bit hacked up to suit the various water port that
we have on here this automotive rather than having traditional mechanical driven pump it's got an electrical water pump and it's got - twenty fittings for each over the lines here's the crank damper so I am going to plough ahead and place some anti-seize on the within of the crank block so install it on to the crank cook snout and it did not quite simply go on that easy and appearance you'll be able to use the block bolt to push on your crank pulley but provided that it's very easy to travel on like this can be super easy and did not have
much resistance at most if you are doing have some resistance you'll be wanting to use a particular installation tool as a result of if you place an excessive amount of force on this pulley bolt you can destroy the threads within the crank and you are gonna have a truly dangerous day if you mess up the threads the torsion on this pulley ball is actually 239 foot-pounds it's very crazy high it just about maxes out the spanner to urge that much torsion I've need to lock the crank from flipping thus what I've done Is I've placed some
of regulator bolts into the rear of the crankshaft and impacted a pry in there therefore the crankshaft cannot turn so thanks for observance I had plenty of fun building the 2jz if you wish to envision additional of this content please share thanks


0 Reviews
What are your experiences on your vehicle ...